Showing posts with label afro texture. Show all posts

Tuesday, November 12, 2013

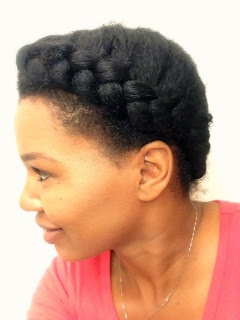
Learning How to French Braid Natural Hair

french braiding natural hair
French Braids on my Natural Hair
Recently I posted a Youtube video on how I french braid my natural hair.  I have been wearing my hair braided up more often recently as part of my No Heat Challenge.  It has made things a little easier for me because the weather is cooler these days.  My hair can get really big and full so the french braids make it possible for me to get a hat on my head whenever I want.  I also use the braids to protect my hair while I'm sleeping at night so I won't have to wake up to tangles in the morning.

I posted the video because I wanted to offer a visual to other naturals of how to do french braids.  I see a lot of comments online from people who have never learned how to braid their hair in this way.  I learned the technique from my mother who braided my hair every week when I was younger.  Sometimes she would do a fancy braided style on my hair but later on she just did one or two french braids with a little bang in front.  When I was about ten years old she taught me how to do it on my own hair.  She also taught me how to do the inverted method which was basically the opposite of french braiding.  I was frustrated with it at first because my braids just didn't look as nice and tight as when she did them.  I eventually got the hang of it though.


CHECK OUT MY VIDEO ON HOW I FRENCH BRAID MY NATURAL HAIR

Having this styling technique in my arsenal made it that much easier when I went natural.  When my hair grew past the TWA stage I knew that I could braid my hair up for a braid out or protective style.  I can see now that I'm also saving money because I've never gone to someone else to have them braid it for me.  Hopefully more people will learn the technique so that they'll have more options when styling natural hair.

Sunday, September 2, 2012

Tips on How to Define Type 4 Curls

My hair wet with product
Sometimes I feel like I should be crowned the Wash n' Go queen by now after all of the products and techniques I've experimented with to achieve the curly look.  Washing my hair and just heading out the door is never the case.  I have curls but they are "type 4" curls.  Yes, I'm talking about the hair typing system.  It's not my favorite way to categorize my hair but hopefully it will give others a way to gage whether my techinques will work for them.

My curls are tight corkscrew coils, lazy "s" shapes and everything in between.  I even have a section that laughs at the idea of curl definition.  Oh and let's not forget about the shrinkage.  I would say mine can be up to 75% but it depends on the day.

In order to get my curls to pop, there are certain things that I must do in order to get the definition I want.  Just so you know, I'm usually looking for hair that will last me a few days without feeling drastically dry and brittle.  I'm still looking for a softer hold solution but at least I've got the curl definition part down.

Here are some things that I have learned when styling my own hair
My hair freshly washed and detangled
using a denman brush.
Dry with no product

1.  Start with clean hair

For some this may mean co-washing; for others, shampoo.  I've noticed that I really do get the best results after cleansing my hair.  Otherwise, I end up with so-so results.

2.  Detangle, detangle, detangle

There are times where I skip this step and I always pay for it.  Not only does this cut help to cut down on the time it takes to apply the products but the hair is also way easier to work with.  Whether you're shingling, raking or combing product through remember to start with detangled hair.

3.  Make sure hair is soaking wet

When my hair begins to dry, all of those pretty little curls go poof!  Any curl defining product out there is really just a way to lock your curls into place.  My hair is at it's curliest when it's dripping wet so I start with that.  When sections begin to dry, I make sure to keep a spray bottle handy so I can wake those curls back up.

4.  Work in small sections

We've all seen the videos where someone takes a quarter size amount of product and applies it to all of their waist length hair and voila; curl definition.  Not for our hair texture!  It's best to keep the sections as small as possible so that each and every little curl can get enough product from root to tip.  Sometimes, big hair is desirable but if you want every curl accounted for, using smaller sections is the way to go.

I get lots of curl definition using product
on wet hair
5.  Smooth those ends

After I have completely raked the product through a section, I always go over my ends, using my fingers, to smooth them out.  This will ensure that the curl lays flatter and discourages those stubborn single strand knots.

6.  Once the products are all in, LEAVE IT ALONE!

This is a biggie.  I've done it myself more times than I can count.  Still, you've got to leave your wet hair be until you've got that, dried "cast" that tells you it's okay to touch your curls.  Even if you choose to diffuse, remember not to handle your hair with your fingers because this will cause lots of unwanted frizz.  Simply tilt your head and let your curls drop into the diffuser so that it can do its' thing.

 I hope these tips will help someone out there.  I sure wish I would have known all of this long ago when I first went natural.  Still, I'm pretty happy with my coily creations and that's all that matters.

Thursday, May 3, 2012

Saying Goodbye to Heat Damage


In the last couple of videos that I posted to YouTube, I discussed my straight, heat damaged bangs and how I styled them so that they would blend in with the rest of my hair.  Shortly after posting those I started a six week Wash n' Go binge and wore my hair curly the whole time.  For a while I was fine with pushing the straight pieces back or braiding the hair into a headband.  During this time I was also reading the Curly Girl Handbook by Lorraine Massey and learning more about my curls and how to work with them.  I kept looking at my damaged hair and wondered, why was I holding on to the straight pieces?

Using small perm rods to camouflage the straight pieces
After much contemplation, I finally decided to break out the shears.  I already knew that I had curly bangs in my future so why not just get on with it?  First, I wet the hair that I sectioned off for the cut.  This made it easier to tell where the textured hair met the straight ends.  Then I placed a long metal clip across that line of demarcation and cut.  I thought that would do it but the straight pieces were still another inch into the length of my bangs so I snipped again.  I was surprised to see a small, one inch section where my hair was just blah; not really curly or straight.  The rest of the bang was curling up the way I expected.  I ended up with a Betty Paige style look which for me was just fine.
AFTER
Short Bangs
BEFORE
Straight Pieces in Front
It's been about a month and a half since the mini chop and I have to say that for the most part, the bangs are fine by me.  The curls are in good shape even after wearing my hair straight a couple of times.  I refuse to use my flat iron on that area because the 400 degree temperature is just too much.  Instead I use my Gold n' Hot Curling Iron which only gets up to 300 at best.  I'm also liking the Paul Mitchell Super Skinny for my heat protectant these days.

I do wish the bangs were a teensy bit longer though so that it would be easier to braid them down into a cute headband.  Of course this is possible with a little help from my Eco Styler gel.  I'm also realizing that I won't be able to slick all of my hair back for awhile.  For now though, I'm just enjoying the new look and loving the curls.
Used a metal clip to section off bangs
Bye Bye Heat Damage
Bangs before cutting a bit more

Check out my post on how I treated my Heat Damaged Hair

Thursday, September 29, 2011

What My Hair Has Been Up To


I know I haven't been posting very much lately but I wanted to share some of the styles that I have been rockin' the last few weeks.  I have actually been wearing my hair straight a little more which I think is coming to an end this week.  At least until I can get my hands on a flat iron that has a heat dial so I can adjust the temperature setting.  My FHI Technique G2 straightens really well but only has one setting...400+ degrees!  I know that a lot of you are thinking why use heat in the first place?  I know, it can be damaging but, I'm one of those Naturals who likes to use it occasionally.  Anywhoo, enough of the straight talk and on to the pics. . . Enjoy!

Corkscrew Braid Out
at the Denver Art Museum

Flat Twist Up Do
My current favorite during the week
to keep my hair protected

Corkscrew Braid Out
with Satin Scarf Headband
with Eco Styler Gel on my edges
Corkscrew Braid Out
Back View

Straight Hair in August just
before Trim

Wash n' Go at City Park

Thursday, September 1, 2011

Biking with Natural Hair

My Bike Helmet
with Flat Twists Underneath
My family and I love going on outdoor adventures.  This summer we have been doing a lot more bike riding together.  I always make sure that the kids wear their helmets but I haven't really been into wearing mine. 

That was until I noticed nearly every other adult on the bike path wearing theirs.  At the very least they had on a cap for sun protection.  So I decided it was time to get out the old bike helmet.  Never mind the fact that it makes me look like Kazoo from the Flintstones.  Safety first, right?  The only thing I had to figure out though was what to do with my thick, curly hair underneath. 

When I go for a bike ride in the morning, the solution is pretty simple.  My hair is usually in twists or braids from the night before so I just wait until after the bike ride to take my hair down.  This means shuttling the kids to school while wearing a satin scarf on my head but hey, I know I'll be cute later on in the day, so that's alright.  I don't even bother removing the scarf because it protects my hair while under the helmet.  Another option is after a braid out when my hair is more flexible, I can get my hair to "lay down" under the helmet without too much of a fight using bobby pins. 


Flat Twists under Helmet
Back View
 Other times though when my hair is up in a bun or puff, the helmet doesn't really work.  Still, in Colorado you really can't get away without some type of sun protection.  The high elevation here can make for some serious sun exposure so I still like to wear a visor and leave my hair up on top of my head like in the pic below. 

So there you go Natural Hair Queens and Curly Goddesses...now there is no reason not to rock your head gear while on your bike ride.  Be safe and happy riding.
Rockin' the Bun with
My Visor

Friday, June 3, 2011

Recovering from Heat Damage

After my most recent bout with heat damage, I wasn't too sure how to go about getting my curls back.  I wore my hair straight for Easter Sunday but decided to use the flat iron again later in the week after using oils in my hair.  My curls did not revert back like they normally did when I wore my hair straight and I was afraid that the damage was permanent.  Was I upset?  You damn skippy I was!  I couldn't believe that I let this happen again.  Not only that, I just chopped off 1/2" of damage at the start of the year which gave me curls galore.  Now I was right back where I started and worse.

What did I do you ask?  Well, I did what I always do when I need answers, I went to the internet.  I was pretty certain that what I was experiencing was permanent heat damage but I was really hoping that someone out there had a magic remedy.  I stumbled onto a YouTube video that I remembered watching by Taren916, where she used the Aphogee 2 step Protein Treatment to help repair her heat damage.  She showed a before shot where her hair was limp and not so curly and another after the treatment when her hair had more texture. 

After watching that, I went to the hair forums and read articles for more info on how the protein treatment worked.  Basically, heat can cause significant damage to the cuticle layer of the hair strand.  This is the protective outer layer (imagine tiny shingles that overlap one another).  Once these cuticles are damaged, the hair is vulnerable and more prone to dryness and breakage.  The protein in the Aphogee treatment helps to fill in the gaps where the hair strand is missing these important little pieces. 
So, the very next day, I shot over to Sally's and made a B-line for the Aphogee products.  I still wasn't too sure if this was all I needed so I grabbed a silicone based conditioner (the GVP version of Paul Mitchell's The Detangler) and said a prayer.  After the application and rinsing it all out, I was very surprised to see curls where there was once very non-descript strands.  The treatment actually worked, but the curls were still looser than before (as you can see from the photo).  My hair was still much thicker at the roots.  Afterwards, I decided to go back to an old regimen I employed when I used to use semi-permanent color on my natural hair. 

Damaged hair regimen:
  • Deep condition 2x per week- 1x with moisture; 1x with protein
  • Stay away from heat...lol
  • Protective styles to avoid further damage
  • My curls 4 weeks after the treatment.
    Using braids to protect hair from too
    much manipulation
  • Silicone based conditioner for detangling and co-washing
I added the silicone conditioner because the primary reason for using silicone in hair products is so that it can help mask damage incurred by heat styling, hair color and chemical treatments.   Thankfully, my hair is back to being nice and curly but is just a bit more stretched than before with a few lazy curls here and there.  Some people use heat for this effect but that was never my intention.  Needless to say, me and my curls are stepping away from the heat for a good, long while.

Tuesday, May 17, 2011

Enjoying Your TWA (Teeny Weeny Afro)

A wash n' go style with Eco Styler Gel
 at 3 months Natural
Sometimes I find people in hair forums who are trying to figure out what to do with their TWA a.k.a. "Teeny Weeny Afro".  Everytime I see this I think to myself, don't they realize how good they've got it?  When I was new to being natural and my hair was shorter than ever, I embraced it.  It was so much fun!  Now don't get me wrong, it took some getting used to.  However, after a nine month transition, it seemed like my hair wasn't short for very long. 

When I think back on it, all I can remember is how easy it was.  My routine was pretty simple.  Each day I either re-wet my hair with my homemade spritz or co-washed it in the shower with a cheapie conditioner.  I didn't really use a lot of products.  I moisturized my hair with leave-in conditioner, my aloe/glycerin/water spray or shea butter.  I tried a few different hair gels and realized that Eco Styler worked the best for making my curls pop.  Other than that, I played around with finger coils, the conditioner only method, and hair accessories.  This was also the time when I started wearing earings more often which turned out to be a great compliment to my short hair. 

Using a large, snap barrett
for something different
My only piece of advice for anyone who is wondering about caring for their short fro is to consider what season you'll be doing the Big Chop.  Why?  Think about it, the only way to work with your newly natural hair will be when it's wet or damp.  So, doing the BC during the winter months is probably not the way to go unless there's no way around it.  This is precisely why I decided to cut the last of my relaxed ends off in May of 2009.  By the fall, I had enough hair to do braid outs, blow-outs, and individual braids.   Other than that, I think you should enjoy your short and sassy TWA.  It's fun and easy to care for.  Ultimately though, for anyone who is going Natural for the long haul, it is also just the beginning.

Wednesday, May 4, 2011

Celebrating 2 Years with Natural Hair

This week marks my two year Natural Hair anniversary.  What does that mean exactly?  Well, it was two years ago this week that I decided to go ahead with the Big Chop and finally let go of the last of my relaxed hair.  Since then, I have tried many different styling techniques and hair products hoping to find what works best for my thick and curly hair texture.  There have been some hits and surely lots of misses but it has been a learning experience all the same. 

The reason for all of my trial error is because I wore my hair straightened by chemical relaxer since age 11.  Before that, my mother styled my hair so the last two years have been my first experience with doing my hair in its' natural state.  Not only that, my hair is beginning to grow past the shorter lengths I am used to which means I'm also learning how to maintain my length. 

So proud of my TWA
in 2009
Still, even after all of the research, hair forums, YouTube videos and my own personal hair trials, I am discovering that I still have a long way to go before I can claim that I have mastered my hair.  My natural hair journey hasn't exactly been easy but it is still something I wish that I had done sooner.  It just makes so much sense to do my hair without all of the extra manipulation that comes with heat styling and chemical processing.  I don't run inside when it rains.  I enjoy my fro and my big hair.  When I get that itch to wear it straight, I can do that too.  I love my natural hair and I can't wait to see where it ends up in the next two years. 

Monday, March 21, 2011

Natural Hair Style--The Corkscrew Braidout

I'm finally all finished with my Corkscrew Braidout video. When I blogged about this style a few months ago, I realized that the process may be easier for other naturals to follow if I just illustrated it in a video on my channel. This has become my go-to style for special occasions because I don't have to use any heat to get a fluffy, curly look. The other reason why I wanted to get this tutorial up is because I noticed that there aren't that many videos on natural hair styles that use setting lotion as the main holding product. I never thought to use it for a braidout but it works great while leaving the hair soft and lightweight. I'm just glad to have finally found a braidout method that is pretty much fool proof and delivers every time.


See more of my videos on my channel "mitchellzee" on Youtube.com

Monday, March 14, 2011

YouTube Inspiration: Trimming Natural Hair

This is the video that inspired me to trim my hair in January.  Normally I just wait to do trims when my hair is straight.  This showed me that I can still get a nice even cut without using heat first to stretch my hair out.   When I straightened my hair out recently I checked to see if there were any long pieces that I missed but was surprised to find that my hair was pretty even.  This method definitely works so I thought I would share.


Video by  YAISnyc

LinkWithin

Related Posts with Thumbnails