Showing posts with label hair journey. Show all posts

Wednesday, January 2, 2013

New Year; Same Hair Goal

Trying to get past this length in 2013
For my hair journey, the beginning of 2013 looks pretty much like the end of 2012.  My main focus this year will be to protect my hair from ME!  That's right, I've figured out the real reason why I'm still sitting at the length I am now.  Some people call it "Scissor Happy" but I'm now calling it counter productive.  I really like when my ends have that blunt cut appearance and when they don't, I'm pulling out the scissors.  As far as retaining length, with this way of thinking, I'm at a stand still with my hair.

Lately I have been looking for ways to distract myself because yes, I've been thinking about cutting again.  I hit APL (Arm Pit Length) at the sides a couple times in 2012 and saw it as an oppurtunity to even things up.  Now, I do still have bangs in the front and layers on the top and sides, so my bottom layer is still the lengthiest part of my hair overall.  I guess I have always wanted to help the other sections catch up to the rest which would mean trimming the longest bits little by little.  Still, even with that being the goal I figured I would just hover at BSL (Bra Strap Length) before trying to make my hair more even.  At this rate, I'll never see BSL which for me is only two more inches away (in back; when the hair is stretched).

Last fall I counted and it looks like I gave myself at least 6-7 trims throughout the year.  Some to get rid of heat damage (searching for the perfect curl) and some to give my hair that look of blunt ends.  My last trim for 2012 was at the end of November and I honestly think I should put the scissors aside until the spring.  I really am curious to see where my hair will end up in the coming months but the urge to cut is always there.  Not sure if I can do it but I'm gonna try.

Thursday, December 13, 2012

Healthy Hair and Skin from the Inside


Recent twist and curl style
I am pretty happy with my hair recently and am feeling like things are getting back to normal.  By that I mean I was having some issues with dry, flaky scalp followed up by a month or two with heavy shedding.  Both issues are finally getting under control so I have been uploading to my YouTube channel more often with hair tutorials.  Before now though it was so frustrating to do anything with my hair because I almost felt like there was no point.  The flakes made it look so bad that I didn't even want to go out some days.

One of the things that I think helped was that I started working on my immune system to help get my skin under control.  I have psoriasis and I have known for a while now that the inflammation in my skin is because of something not quite right with my immune system.  When the psoriasis flared up I started introducing probiotics into my system by eating a serving of Activia yogurt each day.  This helped with digestion and made it possible for my body to absorb my supplements better.  After doing that for 2-3 weeks I decided to go back to a more effective multi-vitamin formulated for women.  It costs more but has proved to be much better for my body than the usual store brands.


So happy my scalp is finally clearing up
I also added some supplements to my daily routine like garlic, super B-Complex and vitamin E.  The garlic helped with the shedding and didn't start working right away but I can tell that I am shedding fewer hairs per wash session now.  I would say it took about a 3-4 weeks before it started to make a difference.  The B-Complex contains biotin and I can see that it is helping my nails so hopefully it's doing something for my hair as well.  The Vitamin E is a given because it's known for being good for the skin.  I usually try to take my multi-vitamin on its own  and then the other supplements together at another time during the day.  Both times are with a meal.  I also started drinking Green Tea for the antioxidants and increased my daily water intake.

With the Colorado climate being especially dry right now,  I hope that this regimen will get me through the winter without having anymore problems.  For now,  I'm using shea butter to moisturize my skin and staying away from heavy oils on my scalp to avoid build-up.  I've also started doing more finger detangling instead of using a tool to get rid of shed hairs.  

NOTE:  As with anything health related be sure and speak with a physician when considering adding vitamins and supplements to your daily routine  

Wednesday, October 17, 2012

DIY Length Check Tee Shirt

Lovin' my new DIY Length Check Tee Shirt
I've been thinking to myself lately that I would like to see how long I can grow my hair in the next six months.  This would mean a little restraint on my part because I would have to put the scissors down for once.  I have been trimming periodically throughout the year including the mini big chop I did on my bangs.  I think I'm finally ready to see how long my hair can get if I just leave it alone and let it grow.

To keep track of my progress I decided to put pen to tee shirt.  I purchased a white tee from one of my favorite thrift stores last year but didn't try it on before purchasing it.  When I got it home I realized that it was too snug for me to wear out so it has been in the drawer ever since.  I figured the tight fit actually made it a good choice for a length check shirt so I got it out.

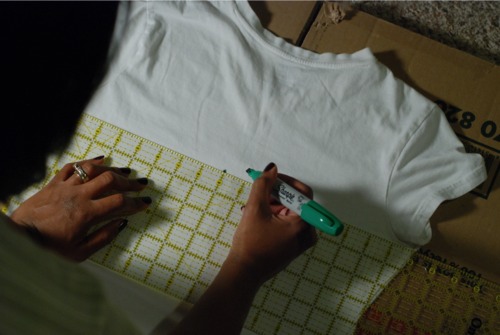
I just used a Sharpie marker and large craft ruler to make lines one inch apart.  I think it would have turned out neater if I used a thinner marker but it should still work just fine.

As of right now I don't intend on growing my hair to anything past MBL (mid back length).  I hear all the time how people want waist length hair but that just doesn't appeal to me.  I keep thinking that would be way too much hair to deal with.  Honestly, I would even be happy with BSL (bra strap length).  At least with the tee shirt I'll be able to see my progress in inches rather than by points on my body.

Here's how I did it

I used a Sharpie Marker, Craft Ruler, White Tee Shirt
and a piece of  cardboard underneath to protect the floor
Don't forget to put something inside the shirt or the ink
will bleed through to the front (see my oops?)

I made a dot to mark the center

Then several dots 1 inch apart

Finally I used the straight edge to draw lines across


Then numbered lines with zero as my starting point

I'm so excited to see how my hair measures up in the coming months.  I'll be sure to post updates when I do my length checks.  

Was this helpful?  Feel free to leave a comment :)

Wednesday, September 26, 2012

Updated Hair Regimen and Products List

I was looking through my blog the other day and noticed that I still had my old regimen from Fall of 2010 up.  There were lots of products listed that I haven't used in ages so I figured it was time to update it.  Here is my current regimen and products list.  I may make some changes (I always do) but this is what is working for me right now.

NOTE: where products are bulleted I just use one of the items listed

Pre-Cleanse
I part my hair in 4 sections and apply conditioner prior to cleansing with shampoo or conditioner.  This helps to stretch out my shrunken hair and remove any shed hairs.  This step also helps with detangling.

Shampoo-1-2 times per week
  • Elasta QP Creme Conditioning Shampoo 
  • TheraNeem Naturals Moisture Therapy Shampoo (sulfate free)
  • KeraCare Dry & Itchy Scalp Anti-Dandruff Moisturizing Shampoo
  • Neutrogena Triple Moisture Cream Lather Shampoo
Co-wash-1-2 times per week
  • Suave Naturals Coconut Conditioner
  • Tresemme Naturals Nourishing Moisture Conditioner
Rinses-After Shampoo
  • Oil Rinse-I use grapeseed, olive or coconut oil.  I sometimes do this in place of deep conditioning.  This step also helps with detangling.
  • Apple Cider Vinegar Rinse (ACV)-I do this step after using shampoo to help my hair get back to a normal pH.  I either do the rinse before or after applying conditioner
Detangling Method
I detangle while my hair is soaking wet and saturated with conditioner.  The hair is parted in four sections.  I start by finger combing and then use a denman brush on each section.  I do this 2-3 times per week when wearing wash n' go's or once per week if wearing stretched styles.

Deep Conditioning Treatments* 1x per week 
  • Hot Oil Treatment with Coconut, Olive or Grapeseed Oils
  • Tresemme Naturals Nourishing Moisture conditioner with Honey or Olive Oil added
 *I do most of my treatments under a hooded dryer for 40 minutes

Moisturizers*
  • Extra Virgin Coconut Oil
  • Aloe & Veg. Glycerin Spray (homemade)
  • Paul Mitchell "The Conditioner" Leave-in
  • Garnier Fructis Leave-in (for heat styling)
  • Hollywood Beauty Olive Creme
To Seal Ends*
  • Coconut Oil mixed with Castor Oil
  • Olive Oil
  • Shea Butter
  • Grapeseed Oil
*I apply Leave-in conditioner after each wash for moisture.  After that I moisturize when needed.

Curl Definers
  •  Eco Gels-The Pink version and Argan Oil (red)
  • Kinky Curly Curling Custard
  • Curls Unleashed Take Command Curl Defining Creme (trial)
*I always use my Paul Mitchell The Conditioner Leave-in under a curl definer for added softnes and moisture

Styling*
Roller Sets, Curly Braidouts,  Wash n Go's, Puffs, Buns, Banded Ponytails, Flat Twists, French Braids
*Currently taking a long break from heat styling

Henna-Once every 3 months
I have started doing the 2 step Henna/Indigo process which gives me a natural black tone  


What I add to my Henna mix
  • Green Tea and Water (enough to make it the right consistency)
  • Olive Oil (usually add this right before application)
  • Lemon Juice (when I want more color)
I sometimes add powder to darken the hair and maintain curls.  For my Indigo mix I only add water and a little salt.  For each step (henna & indigo) I make sure to co-wash after rinsing out.  This helps to keep the hair soft.

Thursday, November 3, 2011

Henna and Indigo Results

I finally got around to ordering my indigo so that I could cover my burgundy hair color with something a little more modest.  I'm sure the bright red henna'd hair I had before is appealing to some but it was not my cup of tea.  I wasn't quite ready for the lengthy two step process where you henna first, rinse out and then apply indigo for a jet black result.  Instead, I mixed one package of Godrej Nupur Henna (50g) with 100 grams indigo.  I ordered the indigo powder from Butters-n-Bars.com which is the same online store where I get my raw unrefined shea butter.
I kept the henna mix pretty simple as always and just mixed it with a mug of strong green tea to help the dye release.  I added enough water to give the mixture a smooth, almost pancake batter consistency and let it sit overnight.  The next day, when I was ready to apply it, I mixed the indigo into a paste with just plain water and added it to the henna.  I don't add oils anymore because I read that it can slow the dyeing process.  I applied the "Hendigo" to my hair like a clay mask and covered with plastic wrap.  Then I waited for four hours before rinsing and then co-washing several times to get it all out of my hair.

The application took very well to the majority of my hair but left my grey strands with just a tinge of color.  I'm planning on doing another application to the roots and grey hairs sometime this week 'cause I don't need everybody knowin' how old I'm getting.  If my greys are still too obvious afterward I may reconsider dyeing my hair all black with the two step process.

My stubborn grey strands are still noticeable 
I like the reddish brown tone in the sun

Tuesday, July 20, 2010

Stay Relaxed or Go Natural?

So there I was without a flat iron and wondering how on earth I was going to start growing my damaged hair longer.  I was already certain that my hair was suffering because of the lighter hair color I decided to use for two years.  What else was I doing wrong?


I jumped on Google and did a search on growing african american hair longer.  I found a site called "growafrohairlong.com".  I read about how the site's founder, Robin Woods, grew her hair to about waist length by using the "Crown & Glory" method.  She talked about using braids as a protective style to help retain hair growth. She also gave suggestions on how to care for the hair like, how to comb it and deep conditioning.  The thing I remember most was how she explained that she only did a relaxer 2 times per year.  Say whatShe would go 6 whole months without a relaxer!  That seemed like an extremely long time to me considering the longest I went between relaxers was 8-10 weeks.                  

My hair after my 1st pregnancy

Monday, July 19, 2010

Why I Went Natural

My hair was neck length to shoulder length and back again for as long as I could remember.  My husband kept telling me that the reason for this was that I kept cutting my hair so often. To that I would say, "I have to cut it. Look at all these split ends!". 

My hair was relaxed and had been since I was 11 years old.  I never even considered that there was any other way.  Once I saw new growth, I went out for another relaxer. Of, course I was doing it all on my own; Haircolor, trims and applying the relaxer myself.  My hair was in a state but I always knew how to mask the damage so that it looked presentable. 

I never thought about the exact cause for my lack of hair growth.  I honestly thought that having long hair was not possible because of my ethnicity (ridiculous, I know, but it was how I thought then).  I didn't start to question it until I watched my husbands hair grow to nearly Mid Back Length in as little as a year and a half.  I asked myself what does he do?  The answer?  Nothing!  He washed and conditioned each day (his hair is straight and will get greasy if he doesn't) then applies a leave-in.  Then he would put on a hat or put it in a ponytail.  That's it!  Then I thought, "What do I do to my hair?".  Let's see there were relaxers, haircolor, blowdrying and using heat daily.  No wonder why my hair was so damaged!

Then, out of nowhere, my flatiron broke.  I am still not sure what was wrong with it but it just quit working.  My first thought was to replace it, but then I thought that it was some kind of sign (I'm funny like that).  I decided to hold off and began searching for an alternative.  Little did I know that this would be the beginning of my natural hair journey.

Next time...Stay relaxed or go natural?

LinkWithin

Related Posts with Thumbnails